JWT를 사용하기 전 여러모로 깨우친게 생겨서 추가로 정리하게 되었다.
Spring Security 기반으로 JWT 를 사용하려면 Security 구현체를 직접 구현시켜서 사용해야 하기 때문에
어느정도 알 필요는 있다..
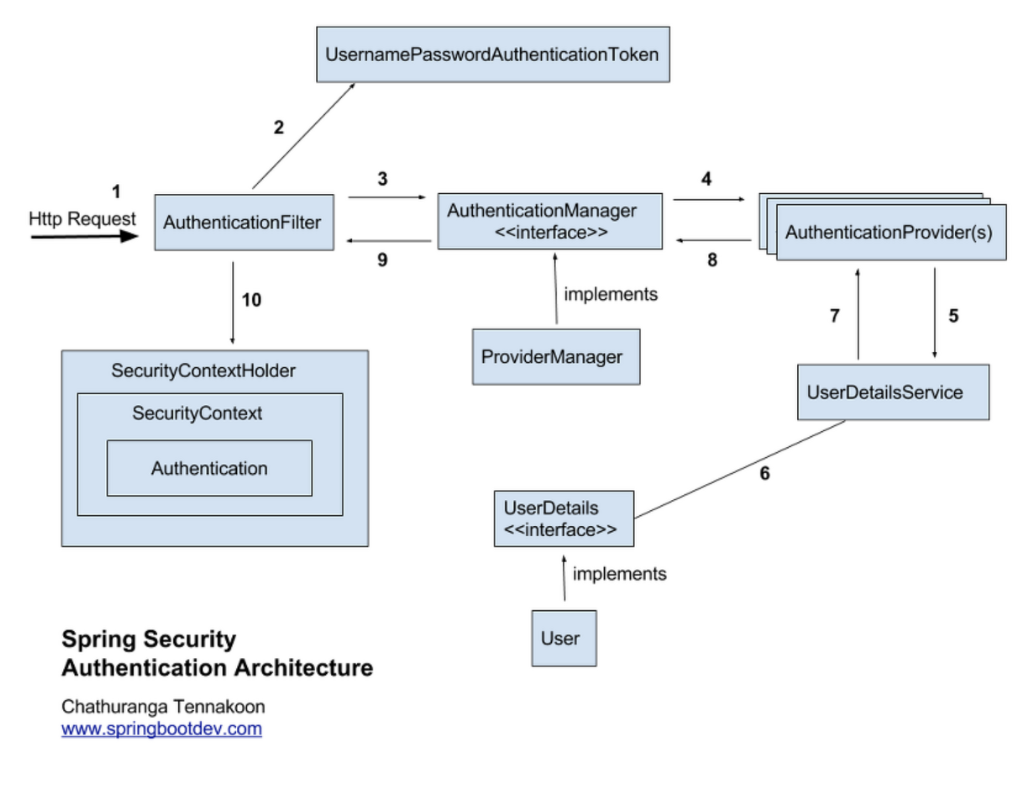
기본적으로 Spring Security는 다음과 같은 구조로 동작을 한다.
Spring Security의 가장 핵심 개념은 인증과 인가이다.
Spring Security 내부에는 여러개의 필터가 Filter Chain 구조로 요청을 처리한다.
대표적인 Filter로 AbstractAuthenticationProcessingFilter 추상클래스가 있는데 이 클래스만 해도
5개정도의 구현클래스가 존재한다.
공식사이트에서 확인할 수 있다.
여기서 핵심역할은 AuthenticationManager 를 통해서 이루어진다.
인증 필터들을 거쳐서 AuthenticationManager 를 통해 Authentication 타입의 객체로 작업을 하게된다.
이 때, 반환타입 또한 Authentication이다.
* 구현 예시
    @Override
    public Authentication authenticate(Authentication authentication)
    				throws AuthenticationException {
        // 인증 처리 이후의 인증토큰.
        String email = authentication.getName();

        String password = (String) authentication.getCredentials();

        ResponseLoginDto responseLoginDto = (ResponseLoginDto) memberDetailsService.loadUserByUsername(email);

        if(!checkPassword(password, responseLoginDto.getPassword())) {
            throw new BadCredentialsException(AUTHENTICATE_DEFAULT_MESSAGE);
        }

        return new UsernamePasswordAuthenticationToken(responseLoginDto, password, responseLoginDto.getAuthorities());
    }
위 메서드는 AuthenticationProvider를 구현한 클래스에서 작업한 오버라이딩 메서드이다.
AuthenticationManager가 핵심 역할인 이유는 UsernamePasswordAuthenticationFilter를 봐야한다.
	@Override
	public Authentication attemptAuthentication(HttpServletRequest request, HttpServletResponse response)
			throws AuthenticationException {
		if (this.postOnly && !request.getMethod().equals("POST")) {
			throw new AuthenticationServiceException("Authentication method not supported: " + request.getMethod());
		}
		String username = obtainUsername(request);
		username = (username != null) ? username : "";
		username = username.trim();
		String password = obtainPassword(request);
		password = (password != null) ? password : "";
		UsernamePasswordAuthenticationToken authRequest = new UsernamePasswordAuthenticationToken(username, password);
		// Allow subclasses to set the "details" property
		setDetails(request, authRequest);
		return this.getAuthenticationManager().authenticate(authRequest);
	}

@Nullable
	protected String obtainUsername(HttpServletRequest request) {
		return request.getParameter(this.usernameParameter);
	}
구현체를 보면 AuthenticationManager를 통해 authenticate메서드를 호출하여
UsernamePasswordAuthenticationToken을 전달하는데, UsernamePasswordAuthenticationToken 객체를 가지고
인증에 대한 요청을 해야한다.
AuthenticationManager는 여러 개의 AuthenticationProvider 들에게 인증에 대한 요청을 한다.
(그 동작코드는 ProviderManager의 authenticate 메서드 로직을 보면된다.)
사실상 AuthenticationManager는 인증처리를 하는 메서드 제공자일 뿐이고,
실제로 처리하는 자세한 로직은 AuthenticationProvider에 의해 구현이 된다.
여기서 AuthenticationProvider는 내부적으로 UserDetailsService 를 이용한다.
UserDetailsService는 인증을 위한 데이터를 가져오는 역할을 하며 loadUserByUsername 메서드를 이용한다.
추가로, UsernamePasswordAuthenticationToken 에는 권한에 대한 정보도 포함하는데,
그 객체를 통해 적절한 권한이 있는지에 대한 인가 절차를 거치게 할 수 있다.
내부 동작 정리
1. 로그인을 요청한다.
2. 여러개의 인증필터를 거쳐 UsernamePasswordAuthenticationToken 이 발급된다.
( == attemptAuthentication 메서드를 거치게된다. )
3. 해당 토큰 객체가 AuthenticationManager에게 전달된다.
4. AuthenticaionManager가 토큰 객체를 AuthenticationProvider 들에게 전달해서 인증을 요청한다.
5. 요청 할 때 UserDetailsService에게 Provider가 받은 객체 중의 username을 전달한다.
6. loadUserByUsername 에서 username으로 데이터를 조회하고 이후 과정을 통해
패스워드를 비교하여 인증된 정보를 UsernamePasswordAuthenticationToken 객체로 반환한다.
7. AuthenticationManager는 토큰 객체를 AuthenticationFilter에게 다시 전달한다음
로그인 성공 관련 핸들러를 통해 SecurityContextHolder에 저장한다.
'Back-End > Security' 카테고리의 다른 글
| Spring Security 동작 및 구조에 대한 심화 학습 (0) | 2022.09.06 |
|---|---|
| Spring Security + JWT (2) (0) | 2022.04.18 |
| Spring Security + JWT (1) (0) | 2022.04.15 |
| 서버와 토큰 기반 인증 시스템의 차이 (0) | 2022.04.15 |
